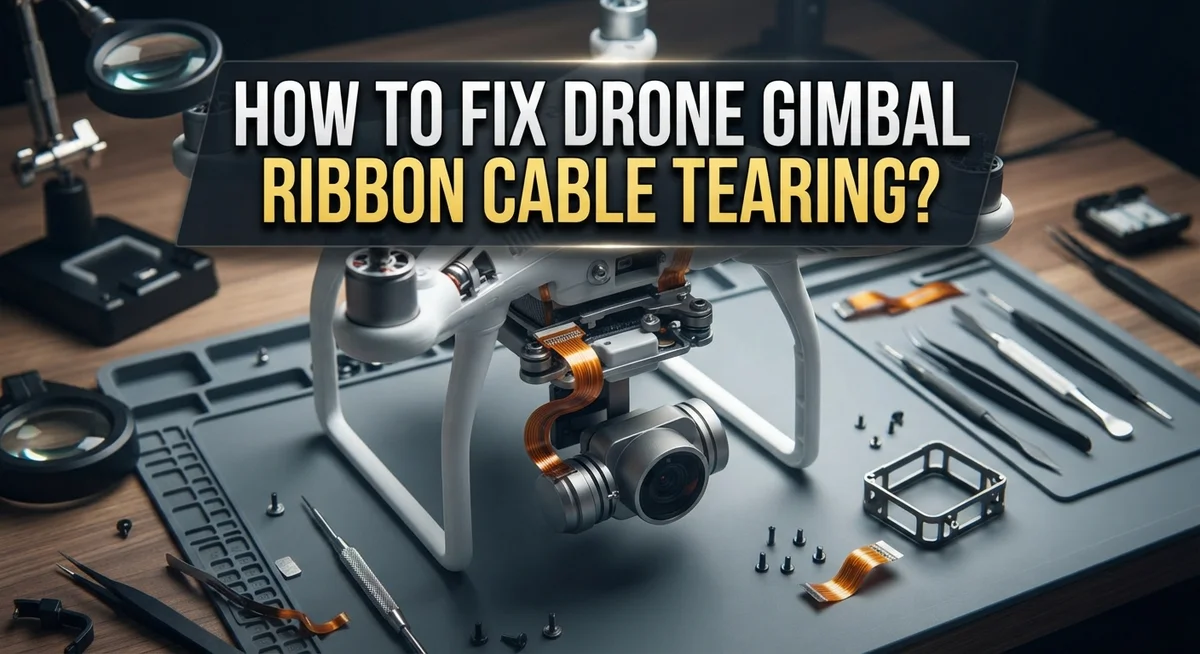
How To Fix Drone Gimbal Ribbon Cable Tearing?
Your drone footage looks shaky and distorted. Your gimbal moves strangely or gets stuck in one spot. If this sounds familiar, you might have a torn ribbon cable.
This tiny cable connects your gimbal to the drone’s main board. It carries all the signals that control smooth camera movement. When it tears, your whole gimbal system suffers.
Ribbon cable damage is a common problem on many popular drone models. Crashes, rough handling, and normal wear all take a toll on this delicate part. The good news? You can often fix it yourself.
In a Nutshell
- Clean first. Use compressed air on the gimbal. Gently move the arm to loosen dust or debris. This simple step sometimes solves the problem without any repair.
- Inspect the cable closely. Look for tears, cuts, or loose connections. This tells you if you need a full replacement or a smaller fix.
- Always use an OEM cable. Generic parts often cause more problems. They may not fit correctly or work as expected.
- Test new cables before fully installing them. Some replacement cables arrive defective. If you have more than one, try each one first.
- Seat the cable properly. Improper seating is a very common mistake. Take your time to align it correctly with the connector.
- Recalibrate after every repair. Skipping this step often leads to erratic gimbal movement. This is one of the most important parts of the whole process.
- Give it time. If your gimbal still acts strange, wait one hour for a full system reset before you worry further.
Understanding Gimbal Ribbon Cables and Why They Tear
Gimbal ribbon cables are thin, flat connectors that transmit power and data signals between your gimbal and your drone’s main control board. They look like small strips of plastic with metal contacts on the ends. These cables enable your gimbal to stabilize video and respond to your commands.
Why do these cables tear? The most common cause is a crash or hard landing. When your drone hits the ground, the gimbal absorbs impact force. The ribbon cable flexes beyond its limits and develops cracks or complete tears. Over time, repeated vibration from flight also weakens the cable’s structure.
Another reason cables tear is improper handling during maintenance. If you bend the cable at sharp angles or twist it forcefully, the internal copper traces snap. Even pulling too hard when disconnecting the cable can damage the delicate connectors on each end.
Environmental factors play a role too. Moisture and salt spray corrode the metal contacts. Temperature changes cause the plastic backing to expand and contract, creating stress on the internal connections. Dust particles can lodge between the cable and its connector, forcing a poor connection that eventually fails.
What happens when the cable tears? Your gimbal stops responding smoothly. Video appears shaky, jittery, or distorted. The gimbal may tilt in unexpected directions or freeze completely. Some drones show error messages on the controller screen. Others simply produce unusable footage because the camera moves erratically.
The good news is that ribbon cable damage is fixable. You do not need professional equipment or advanced skills. Most repairs involve cleaning, inspecting, replacing the cable, and recalibrating your gimbal system. Understanding how these cables work helps you avoid damage in the future and recognize problems early. Proper storage and gentle handling during repairs prevent many tears from happening in the first place.
Signs Your Gimbal Ribbon Cable Is Damaged
Your gimbal ribbon cable sends warning signs before it completely fails. Learning to spot these signals helps you catch problems early and avoid worse damage.
Video feed looks shaky or distorted. If your drone records footage that jumps around or has strange lines across the screen, the ribbon cable may have a partial tear. The connection still works, but not smoothly. You might notice the problem only appears during certain movements or when you pan quickly.
Gimbal won’t respond to your commands. When you try to move the gimbal using your remote control, nothing happens. The gimbal stays frozen in one position. This suggests the cable lost its electrical connection entirely. Sometimes the gimbal responds to some movements but not others, which also points to a damaged cable.
Gimbal drifts or moves on its own. A torn cable can send false signals to your gimbal motor. Your gimbal might tilt slowly without you touching any controls. It could also jerk suddenly in random directions. This erratic behavior wastes battery power and ruins your footage.
You see physical damage on the cable itself. Inspect the ribbon cable visually if you can access it. Look for visible tears, cuts, fraying edges, or bent sections. Even small tears cause big problems. The cable is delicate, so handle it gently during inspection.
Gimbal calibration fails repeatedly. After a crash, you try to recalibrate your gimbal but the process won’t complete. Your drone keeps showing calibration errors. This often means the ribbon cable connection is too loose or partially damaged to send proper signals.
Strange clicking or buzzing sounds come from the gimbal. Your gimbal makes unusual noises even when stationary. This happens when the motor tries to move but the signal keeps cutting out. The motor struggles to understand what it should do next.
Tools and Preparation Needed Before Starting Repairs
Before you start fixing your drone’s gimbal ribbon cable, gather the right tools and prepare your workspace. Having everything ready saves time and prevents frustration.
Start by finding a clean, flat work surface. A table or desk works perfectly. Make sure the area has good lighting so you can see small cable connections clearly. Poor lighting causes mistakes during delicate repairs.
You’ll need basic hand tools for this job. A small screwdriver set is essential for removing gimbal screws. Get one with multiple sizes, including very small tips. A plastic spoon or non metal pry tool helps you gently separate cable connectors without damaging them. Metal tools can short circuit your drone’s electronics.
Next, gather safety items. An anti static wrist strap protects your drone from electrical damage caused by your body’s static charge. This is really important when working with ribbon cables and circuit boards. A small container or tray keeps tiny screws from rolling away and getting lost.
You’ll also need cleaning supplies. Compressed air removes dust and debris from the gimbal area before you start repairs. A soft brush helps dislodge stubborn particles. Never use liquids on electronic components.
Have your replacement ribbon cable ready before beginning. Make sure it matches your drone model exactly. Keep the packaging so you can return it if it arrives defective.
Finally, prepare a phone or tablet nearby. Video guides for your specific drone model are invaluable during repairs. They show exactly where cables connect and how much force is safe to use.
Take a photo of your gimbal before disassembly. This reference image helps you remember where everything goes during reassembly. Many people forget connector positions and struggle putting things back together correctly.
Once you have these items organized, you’re ready to proceed with confidence.
Step-by-Step Guide to Replacing a Torn Gimbal Ribbon Cable
Start by powering off your drone completely. Remove the battery and wait a few minutes for any residual power to drain. This protects both you and your equipment from electrical damage during the repair.
Next, carefully disassemble the gimbal housing. Most drones have screws holding the gimbal cover in place. Remove each screw slowly and keep them organized in a small container. Take photos of each step so you can reassemble everything correctly later.
Once the housing is open, locate the ribbon cable. Gently clean the gimbal area with compressed air first. This removes dust and debris that might be causing connection issues. Move the gimbal slowly by hand to help dislodge any particles stuck inside.
Now identify where the ribbon cable connects to the main circuit board. You’ll typically see a small connector or socket. Carefully release the locking mechanism, which is usually a small clip or lever. Pull the old cable straight out without twisting or bending it.
Insert your replacement ribbon cable into the same connector. Make sure it slides in completely and sits flat. The cable should feel snug but not forced. Lock the connector by pushing the clip back into place.
Before reassembling, test the connection by powering on your drone briefly. Check if the gimbal responds to your commands. If it does, power off immediately and proceed with reassembly.
Reinstall the gimbal housing cover and tighten all screws evenly. Don’t overtighten, as this can crack the plastic housing. After reassembly, recalibrate your gimbal through your drone’s software. This step is crucial for smooth operation.
If your gimbal still acts erratic after replacement, the issue might be elsewhere. Try recalibrating again and allow your system to reset for at least one hour. Sometimes the controller needs time to recognize the new cable properly.
Calibrating the Gimbal After Cable Replacement
After you replace a torn gimbal ribbon cable, your drone needs proper calibration. This step is crucial because the gimbal must relearn its position and movement range. Skip this part and your video will still shake or drift.
Start by powering on your drone and connecting it to your remote control. Open your drone’s app on your phone or tablet. Navigate to the settings menu and find the gimbal calibration option. This location varies by drone model, so check your manual if you can’t locate it.
Before you begin calibration, place your drone on a flat, level surface. The gimbal must sit perfectly still during this process. Any movement or vibration will cause calibration to fail. Make sure you’re indoors away from wind or air currents.
Tap the calibration button in your app. The process usually takes 30 to 60 seconds. Your gimbal will move through its full range automatically. You’ll hear small motors working and see the gimbal shift positions. Let this happen without interrupting it.
If calibration completes successfully, your gimbal should respond smoothly to commands again. Test it by moving the gimbal up, down, left, and right using your remote control. The movement should feel fluid and responsive.
Sometimes calibration fails on the first try. This is normal after cable replacement. Power off your drone completely and wait 2 to 3 minutes. Power it back on and attempt calibration again. If it fails multiple times, your new ribbon cable might be defective or improperly seated.
Check that the cable connector clicks firmly into place. If the cable isn’t fully inserted, calibration will always fail. Reseat the cable and try again. Most calibration issues resolve after proper cable installation and a second attempt at the calibration process.
Common Mistakes to Avoid During Repair
When repairing your drone’s gimbal ribbon cable, certain mistakes can make your problem worse. Avoid installing a defective replacement cable without testing it first. Many people order a new cable and assume it works. They install it immediately and discover the cable is faulty. Instead, test your replacement cable if you have access to multiple units. This saves time and frustration later.
Improper cable seating causes most installation failures. The ribbon cable must click firmly into its connector. Push the cable straight in without twisting or angling it. If you force the cable at an odd angle, the pins inside the connector bend or break. Take your time during this step. The cable should slide smoothly into place with gentle, steady pressure.
Another critical mistake is skipping gimbal calibration after you replace the cable. Many people assume the repair is complete once they reassemble the housing. The gimbal still needs to recalibrate its sensors and positioning. Without calibration, your gimbal continues acting erratic even though the cable is new. Always run the calibration process in your drone’s app after cable replacement.
Don’t rush the disassembly and reassembly process. Moving too quickly leads to dropped screws, bent connectors, or misaligned components. Work slowly and document each step with photos. This approach prevents confusion when you reassemble everything.
Avoid touching the connector pins with bare fingers. Oils from your skin can create poor electrical contact. Use clean gloves or handle the cable by its edges only.
Finally, resist the urge to bend or fold the ribbon cable sharply. Even new cables tear easily under stress. Keep the cable flat and straight during installation. These precautions protect your repair investment and ensure your gimbal functions properly once you’re finished.
Troubleshooting Persistent Gimbal Issues After Repair
After you replace your gimbal ribbon cable, problems sometimes continue. This happens more often than you might expect. Let’s walk through what to do when your gimbal still misbehaves after the repair.
First, check if the new cable itself is defective. Replacement parts occasionally arrive broken or damaged. If you have access to another replacement cable, install it and test your gimbal. This simple swap reveals whether the original new cable was the culprit. Many people skip this step and assume they installed it wrong.
Next, verify that your top board is compatible with your drone model. If you replaced both the cable and the top board, mismatched parts cause erratic gimbal movement. Check your drone’s manual to confirm part numbers match your specific model.
Allow your system time to reset completely. Power off your drone and leave it disconnected for at least one hour. This gives the gimbal controller time to clear any error states from the previous malfunction. After the wait period, power on and try calibration again.
Gimbal erratic behavior after repair often points to calibration issues. Run the calibration process multiple times if needed. Sometimes the first attempt doesn’t take properly. Your drone app should walk you through this step by step on a flat surface.
If problems persist after trying these steps, the issue may exist elsewhere in your gimbal system. The motor itself could be damaged from the original crash. The gimbal arm might have internal damage you can’t see from outside.
At this point, consider whether repair is still practical for your situation. Some drones have gimbal assemblies that are easier and more cost effective to replace entirely rather than troubleshoot further. Document what you’ve tried so far. This information helps if you seek professional repair services later.
Final Thoughts
Fixing a torn gimbal ribbon cable takes patience and a steady hand. You now know the full process. Clean the gimbal first, then move to cable replacement if needed.
Small mistakes cause big problems in this repair. A cable that clicks in loosely will fail again soon. Rushing through disassembly often leads to more cracks or tears.
Most repairs cost between $100 and $150 when done at home. This price beats sending your drone to a repair shop. You save money and gain useful repair skills.
Some repairs need more than a cable swap. If the ribbon cable keeps failing, check the top board. A damaged board often mimics cable problems and confuses new drone owners.
Testing your drone after every repair step saves time later. Fly it in an open space first. Watch how the camera responds to movement commands.
Video guides help a lot during tricky steps. Your drone model matters here since parts differ between the Mini, Mavic, and Phantom lines. Match your repair steps to your exact model.
Calibration remains the final key step. Skip it, and your gimbal may drift or shake during flight. This simple step takes just a few minutes but fixes many post-repair issues.
Sometimes a repair does not work as planned. A second replacement cable might solve stubborn problems. Defective parts happen more often than most people expect.
Know when to stop trying home fixes. If problems continue after multiple attempts, a professional repair service may save you time and frustration.
Your drone deserves careful handling during every repair stage. Take your time with each connector and screw. This approach protects your investment and gets your gimbal working smoothly again.
With the right tools and steady focus, most drone owners can complete this repair successfully at home.
Frequently Asked Questions
What causes a drone gimbal ribbon cable to tear?
Ribbon cables tear from physical impact and normal wear. Crashes are the most common cause of immediate damage. Over time, repeated gimbal movements can stress the cable and cause small tears to grow larger. Debris buildup inside the gimbal assembly can also create friction that damages the cable. Heat exposure and age make cables more brittle and prone to breaking.
How do I know if my ribbon cable is actually torn?
A torn ribbon cable shows clear signs in your drone’s performance. Your gimbal may move erratically or refuse to move at all. Video feed from your camera becomes distorted or shaky. The gimbal might tilt to one side and stay stuck. You may see visible damage if you inspect the gimbal closely. Sometimes the cable looks fine but still causes problems due to internal breaks.
Can I repair a torn ribbon cable or must I replace it?
You cannot repair a torn ribbon cable effectively. Attempting to glue or tape the cable usually fails because the internal conductors are damaged. The best solution is to replace the entire cable with a new one. If cable replacement doesn’t fix your gimbal, your top board may also need replacement.
How long does gimbal recalibration take after cable replacement?
Recalibration typically takes 5 to 10 minutes through your drone’s app. However, your system may need over 1 hour to fully reset after repair. Allow extra time for the gimbal to stabilize. Run the calibration process multiple times to ensure proper positioning. Test your gimbal movements gently before flying.
What if my new cable is also defective?
Defective replacement cables do happen occasionally. Test your new cable immediately after installation. If problems continue, try a different replacement cable if available. Verify your top board works correctly and matches your drone model. Contact support if multiple cables fail to solve the issue.

Hi, I’m Jessamine Rowell, the founder and voice behind ResizeMake (https://resizemake.com/), a space where I share my love for technology with the world. I write detailed and honest reviews on the latest tech products, gadgets, electronic devices, and trending Amazon items to help readers make smarter buying decisions.